
TDD Seaside Sailor Sew-a-long links:
Day 1: Preparing the Pattern
Day 2: Cutting Out and Collar Assembly
Day 3: Sewing the Bodice
Day 4: Preparing the Skirt (that's today)
Day 2: Cutting Out and Collar Assembly
Day 3: Sewing the Bodice
Day 4: Preparing the Skirt (that's today)
Today we are going to be sewing the skirt and getting it ready to attach to the bodice. This should be a pretty simple sewing day but I have a few things to highlight for you along the way! Start by grabbing your skirt pieces. For baby sizes there is only one piece. For bigger girls there are two skirt panels; sew and finish the side seams.
We are going to start by making the hem pleats I showed you on Monday. Bear with me just a little bit though, if you are doing this on a girls size dress we first need to sew the hem. However, if you are making a baby size, we will do the hem later.
So let's talk about hemming the girl's size skirt first. Regardless of whether you are making hem pleats or not, the hem depth will be the same for each method. Fold and iron your hem according to the pattern (pg 13). If you are making the hem pleats a simple topstitched hem is best. A topstitched hem is also ideal if you plan to add a trim, such as rick rack to the hem. If you are not adding any other detail to the hem consider using a blind hem on your sewing machine. Each machine's settings are a little different so refer to your sewing machine manual for specifics, but I'll give you a few general pointers here.
Okay... now we are ready to make the hem pleats I showed you on Monday. If making the hem pleats your skirt needs to have an extra three inches of length. And remember you should have a basic topstitched hem in place if you are making a girl's size dress. Here we are going to have to diverge from the pattern just a bit.

The method is the same for both baby and girls sizes, but the initial measurement is different. For girls sizes measure 1" from the stitched hem and mark a line all the way around the skirt.

If you are making pleats on a baby size (remember we have not hemmed it yet) measure 3 1/2" from the bottom of the skirt and mark a line all the way around.
 Now we can continue together for both baby and girls sizes. Fold along line you just marked. Stitch 1/2" from the edge.

Press this pleat down. Now measure 1" up from that stitching line and mark again.
 Fold, stitch, and press as before. Repeat one more time measuring 1" from the last stitching line.
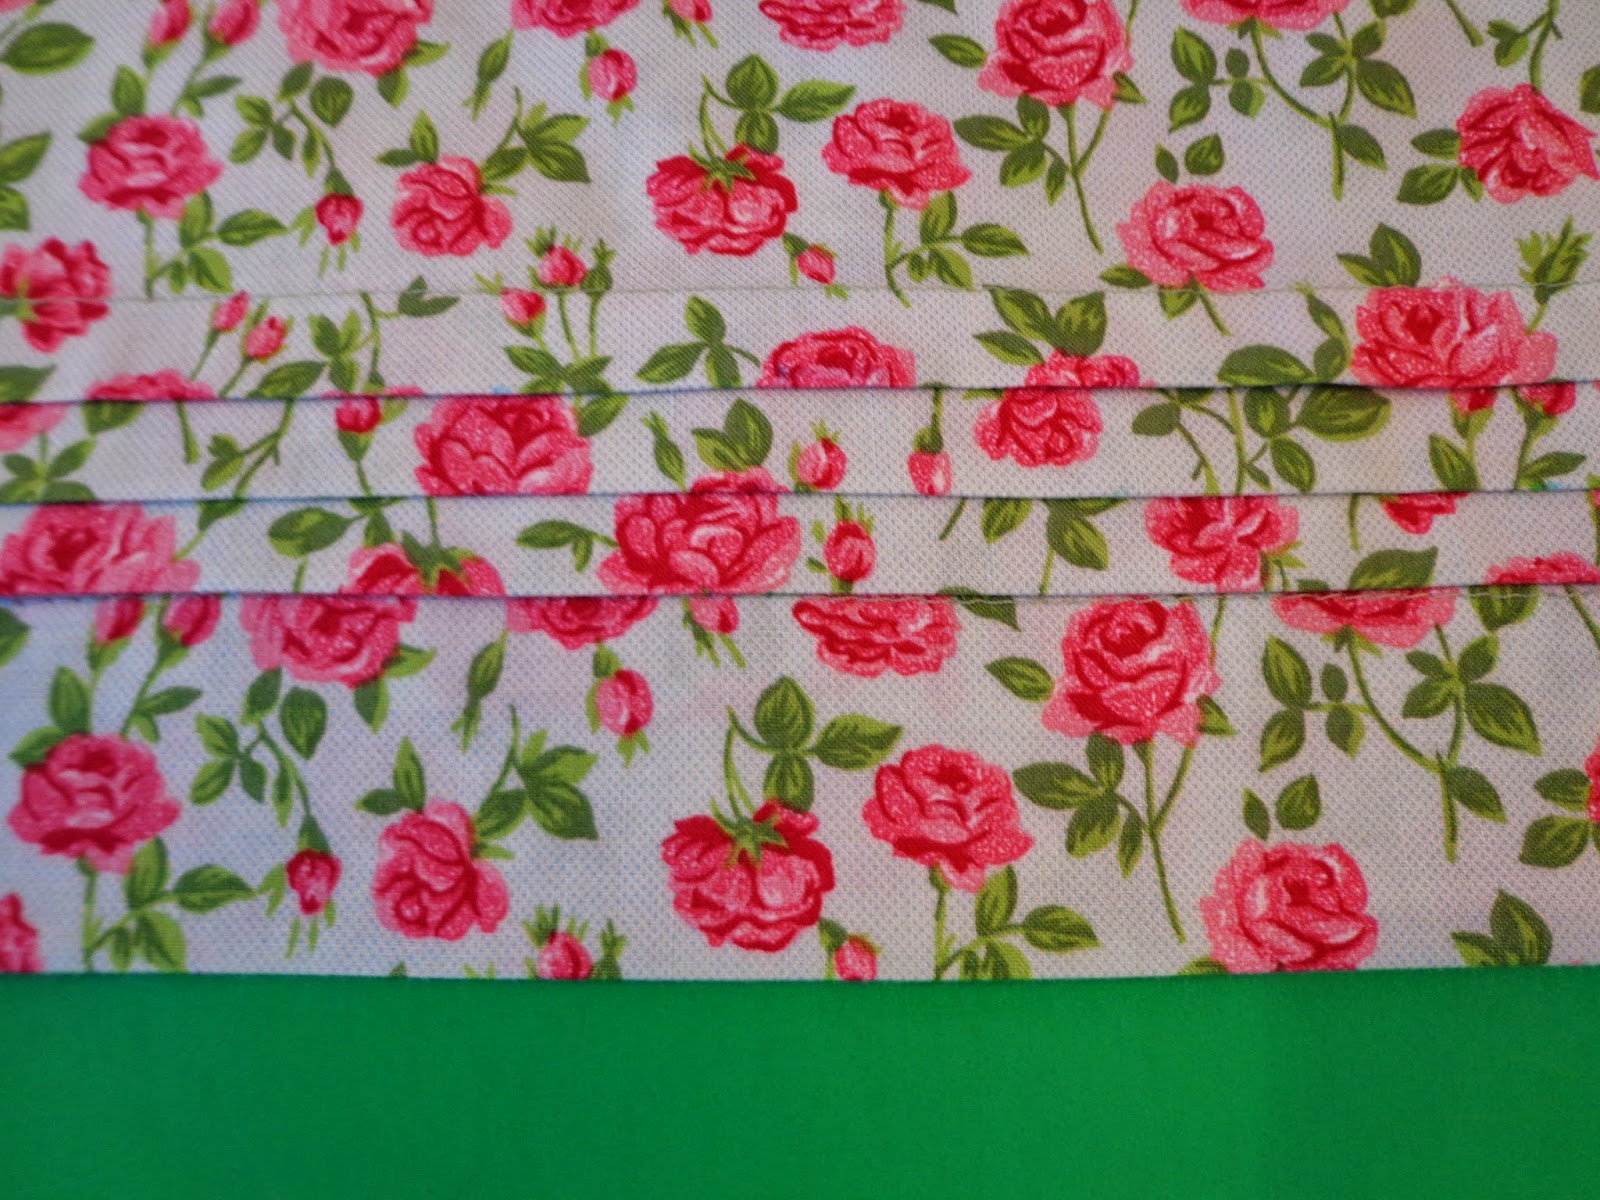
Sit back and admire your beautiful pleats!
Now just a few more steps for today's work! For baby sizes you need to fold the front placket and hem as describes on page 10 of your pattern. When folding and stitching the placket, take care to make sure your hem pleats (if you made them) all stay pressed down. Also, when stitching the hem on a baby skirt with hem pleats you will need to lift the bottom pleat slightly so as not to catch it in your stitching.
If you have not sewn pleats and are adding Rick Rack or other trim to your hem, now is the time to add it. On baby sizes heat seal the ends, wrap over the placket edge, and stitch in place. For girls sizes I also heat seal the ends and then stitch starting just to the back side of the side seam and around the skirt, overlapping the edges when they meet.


Finally sew your gathering threads. I always use the two thread gathering method. It provides the most even and pretty gathers, in my opinion. If you have another favorite method, feel free to use that. On the baby sizes sew gathering threads from one front edge all the way around to the other side. For girls sizes (or any skirt with side seams) I always start stitching at one side seam, stop at the opposite side and break my threads, then stitch the second panel. This makes for easier gathering later!
That's it for today! I'll see you back here tomorrow to finish up your Seaside Sailor Dress!
Make sure you check in on the daily thread in the Tie Dye Diva Sewing Pattern group on Facebook. What are we giving away today? You'll have to check in to see! Also ask your questions there so that we are sure to see them quickly. Jen, Erica and myself will be ready to help all we can!
 |
| Baste your folded hem in place. This is where you need to check your manual for the proper stitching placement |
 |
| Fold your hem back on the basted stitching line. The photo above shows what it should look like on both sides. |
 |
| Select your blind hem stitch on your machine. A blind hem stitch looks like stitch 09 above. |
 |
| Above are two examples of a blind hem foot. On the left is the foot for my Pfaff. The foot on the right is for my Brother machine. Find and attach your blind hem foot. |
 |
| The bar or stitch guide in the center of the foot should run right along the folded edge. The small 'zig zag' stitch should just catch a tiny bit of the fold. |
 |
| This is the finished blind hem on the outside of the skirt. |
 |
| Up close on the outside, you can see tiny stitches in the red and green, but the stitches are nearly invisible everywhere else. |
Okay... now we are ready to make the hem pleats I showed you on Monday. If making the hem pleats your skirt needs to have an extra three inches of length. And remember you should have a basic topstitched hem in place if you are making a girl's size dress. Here we are going to have to diverge from the pattern just a bit.
The method is the same for both baby and girls sizes, but the initial measurement is different. For girls sizes measure 1" from the stitched hem and mark a line all the way around the skirt.
If you are making pleats on a baby size (remember we have not hemmed it yet) measure 3 1/2" from the bottom of the skirt and mark a line all the way around.
Now we can continue together for both baby and girls sizes. Fold along line you just marked. Stitch 1/2" from the edge.Press this pleat down. Now measure 1" up from that stitching line and mark again.
Fold, stitch, and press as before. Repeat one more time measuring 1" from the last stitching line.Sit back and admire your beautiful pleats!
Now just a few more steps for today's work! For baby sizes you need to fold the front placket and hem as describes on page 10 of your pattern. When folding and stitching the placket, take care to make sure your hem pleats (if you made them) all stay pressed down. Also, when stitching the hem on a baby skirt with hem pleats you will need to lift the bottom pleat slightly so as not to catch it in your stitching.
If you have not sewn pleats and are adding Rick Rack or other trim to your hem, now is the time to add it. On baby sizes heat seal the ends, wrap over the placket edge, and stitch in place. For girls sizes I also heat seal the ends and then stitch starting just to the back side of the side seam and around the skirt, overlapping the edges when they meet.
Finally sew your gathering threads. I always use the two thread gathering method. It provides the most even and pretty gathers, in my opinion. If you have another favorite method, feel free to use that. On the baby sizes sew gathering threads from one front edge all the way around to the other side. For girls sizes (or any skirt with side seams) I always start stitching at one side seam, stop at the opposite side and break my threads, then stitch the second panel. This makes for easier gathering later!
That's it for today! I'll see you back here tomorrow to finish up your Seaside Sailor Dress!
Make sure you check in on the daily thread in the Tie Dye Diva Sewing Pattern group on Facebook. What are we giving away today? You'll have to check in to see! Also ask your questions there so that we are sure to see them quickly. Jen, Erica and myself will be ready to help all we can!
Comments