I adore our Garnet Dress, Top and Skirt Pattern for Girls! When the pattern was first released last winter Sweet Pea had six of them in her closet! Now it's time to sew some more.
The Garnet Pattern features a knit bodice with drop waist and a twirly circle skirt that can be made from either knit or woven fabric. The sewing pattern includes options for making a dress, skirt, or top. You can choose from a single fabric skirt or paneled skirt, and long sleeves (plain or ruched) or short sleeves. That's 19 ways to sew this pattern - it really is a versatile sewing pattern that you will grab over and over through every season. The pattern includes sizes 12/18 months through girls 9/10 and truly suits all ages!
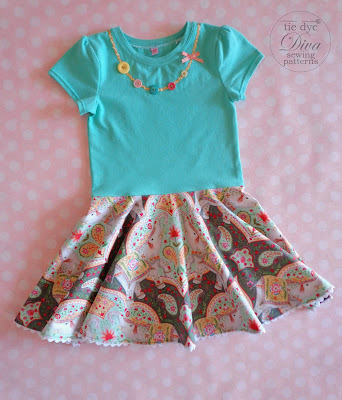
The Garnet pattern also includes an adorable, petite collar designed for woven fabric. It is sweet perfection. But, sometimes you want to do something different. Today I'll show you how to omit the collar and sew a neck band on your Garnet Dress or Top. Use this method when making the Top view and you get a perfect basic, girly tee for every day and layering!

I have the pleasure of using the gorgeous Season of Love collection by Ana Davis for Blend Fabrics. This is an Indian-inspired collection featuring elephants and peacocks in mint, coral, and yellow tones.This fabric has been provided to us free of charge so we can bring you awesome tutorials like this one.

Take a closer look at these gorgeous elephants I'm using today!

You might also love the pink colorway of this print. Swoon!
The Season of Love collection's just been released and as of right now is a little scarce online. You can find some prints from this collection for pre-order at The Palm Cottage on Etsy, or you can contact Blend Fabrics and they will help you find a store near you that carries Season of Love.
The Season of Love collection's just been released and as of right now is a little scarce online. You can find some prints from this collection for pre-order at The Palm Cottage on Etsy, or you can contact Blend Fabrics and they will help you find a store near you that carries Season of Love. {EDITED: In stock now at The Palm Cottage, go take a look!}
Ready to add a neckband? Me too! I couldn't be happier with how this modification turned out. Begin by printing and assembling and cutting out your Garnet Pattern. Do not cut out the collar or neck binding pieces.
Before I started constructing my bodice, I decided to dress up the tee portion just a bit. I used this Button Necklace Tee Tutorial (make sure you check out how tiny Sweet Pea was!) with just a couple modifications. I added the embellishment before any sewing and simply sewed the rick rack ends into the shoulder seams instead of around the entire neck. I also only made one 'strand' instead of two.

Now we're ready to construct the bodice for a neckband.


The Garnet Pattern features a knit bodice with drop waist and a twirly circle skirt that can be made from either knit or woven fabric. The sewing pattern includes options for making a dress, skirt, or top. You can choose from a single fabric skirt or paneled skirt, and long sleeves (plain or ruched) or short sleeves. That's 19 ways to sew this pattern - it really is a versatile sewing pattern that you will grab over and over through every season. The pattern includes sizes 12/18 months through girls 9/10 and truly suits all ages!


I have the pleasure of using the gorgeous Season of Love collection by Ana Davis for Blend Fabrics. This is an Indian-inspired collection featuring elephants and peacocks in mint, coral, and yellow tones.This fabric has been provided to us free of charge so we can bring you awesome tutorials like this one.

Take a closer look at these gorgeous elephants I'm using today!

You might also love the pink colorway of this print. Swoon!
 |
| Image courtesy of Blend Fabrics |
The Season of Love collection's just been released and as of right now is a little scarce online. You can find some prints from this collection for pre-order at The Palm Cottage on Etsy, or you can contact Blend Fabrics and they will help you find a store near you that carries Season of Love. {EDITED: In stock now at The Palm Cottage, go take a look!}
Ready to add a neckband? Me too! I couldn't be happier with how this modification turned out. Begin by printing and assembling and cutting out your Garnet Pattern. Do not cut out the collar or neck binding pieces.
Before I started constructing my bodice, I decided to dress up the tee portion just a bit. I used this Button Necklace Tee Tutorial (make sure you check out how tiny Sweet Pea was!) with just a couple modifications. I added the embellishment before any sewing and simply sewed the rick rack ends into the shoulder seams instead of around the entire neck. I also only made one 'strand' instead of two.

Now we're ready to construct the bodice for a neckband.
- First, sew and finish the shoulder seams. You may wish to reinforce these seams with a piece of clear elastic.
- Next, measure the neck opening at the seam line (3/8" from the edge). I find the easiest way to do this is to mark the seam lines on the pattern pieces and measure from there. Here you see I marked the 3/8" shoulder and neck seams (in red). Do not include the shoulder seam in your measurement.

- Now for just a little bit of easy math. Remember that both front and back are cut on the fold so double your measured numbers. I'll add my numbers for a 3T in parentheses. (Front = 9", Back = 7.25")
- Add the total length of the front and back neck edges together. (9 + 7.25 = 16.25)
- Multiply that number by .8. (16.25 x .8 = 13)
- Add .75 for the seam allowance. (13 + .75 = 13.75)
- This is the length needed for your neckband.
- Cut your neck band the length found above (13.75" for 3T) by 1.5" wide.
- Fold with long edges together and press a crease.

- Open the neckband back up and sew the short sides with right sides together to form a loop. Press this seam open and refold on the crease.

- Now mark quarter points on both your neckband and bodice neck edge. On the bodice first find center front and back by folding on the shoulder seams. then match center front and back to find the side quarter points. The side quarter points will be slightly to the front of the shoulder seams.

- Pin neckband and neck edge right sides together. Match quarter points, placing the neckband seam at the center back and adding pins between points.

- Sew using a stretching stitch (described on page 5 of the Garnet pattern). Be sure to stretch the neck band to match the neck edge, but do not stretch the bodice neck edge. Finish this seam.
- Press well using steam. Press the seam towards the bodice. Optionally, topstitch. I prefer to topstitich and do so with a twin needle (if you've never used a twin needle check out Jen's tutorial). It keeps the seam neatly secured in place.


Finish your Garnet per the pattern instructions. Because my main skirt fabric is a directional print, I used the Pink Pin Tip on page 4 to add side seams to my skirt. The full circle skirt makes it nice and twirly!


 |
| Take a closer look at this beautiful print! |
Another option finishing the neckline is to make a neck binding (rather than this neck band we've made today). The order of construction and measurement are the same. Simply use this Neck Binding Tutorial for the actual sewing of the neck edge. It gives a slightly different look.
I love the knit bodice on this dress. It makes it perfect for everyday comfort wear. Throw some Sterling Shorties (minus the ruffles) underneath and you're playground ready. Perfect for Back to School. For more Back to School styles from this lovely Season of Love fabric, be sure to check back next week!


The Garnet Dress, Top, and Skirt pattern is available for download at www.tiedyedivapatterns.com.
Comments