Today I will show you how to make your own double fold bias tape from any fabric, how to sew it to your Tie Dye Diva creations (or any garment) and how to finish overlapping ends for for the most professional look.
Jen's patterns that require bias tape include a complete tutorial on how to make it yourself. But sometimes you might want to add it to another pattern - it's a quick way to hem any pattern, for example. So today we'll go over the process here on the blog.
Today I'm using bias tape to hem the Fair & Square Top and Dress pattern, and also to make the elastic casing on the Pretty Pantaloons pattern. I'm using fabric from the Sun-sational collection by Maude Asbury for Blend Fabrics This fun, beachy collection is sure to make you dream of tropical vacations, sand and sun! The fabric was provided to me by Blend Fabrics, but all opinions are my own.


The uses for double fold bias tape are numerous. Add it to the hem of any skirt or dress as I have here. Omit the ruffle from the RufflePOP skirt and instead finish with bias tape for a fun, non ruffled skirt. Trim the sleeves on your LaTulipe Dress or trim the pockets on your Potato Chip skirts. Double Fold bias tape is a great, easy way to add just a narrow pop of color when a ruffle isn't what you need!
Previous TDD Tutorial Tuesdays you might enjoy:
Jen's patterns that require bias tape include a complete tutorial on how to make it yourself. But sometimes you might want to add it to another pattern - it's a quick way to hem any pattern, for example. So today we'll go over the process here on the blog.
Today I'm using bias tape to hem the Fair & Square Top and Dress pattern, and also to make the elastic casing on the Pretty Pantaloons pattern. I'm using fabric from the Sun-sational collection by Maude Asbury for Blend Fabrics This fun, beachy collection is sure to make you dream of tropical vacations, sand and sun! The fabric was provided to me by Blend Fabrics, but all opinions are my own.

Double fold bias tape can be used in numerous applications, so lets jump right in with how to make your own bias tape and then we'll talk about some of the ways to use it.
First, just a wee bit of math to see what size square you need to start with.
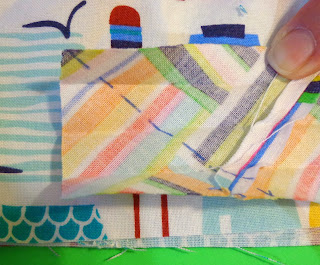
Fold your square point to point so you have a triangle with the bias along the folded edge.

Trim of just the very edge giving you two triangles

Now cut your bias strips the width you previously decided. Mine are 2" wide.

Discard the little triangles on top. Your bias strips are ready to be sewn together. I know it doesn't look like much, but it will be enough!

Sew your strips together by aligning the edges as seen below. I like to sew a long piece to a short piece to spread the strip sizes out more uniformly.
First, just a wee bit of math to see what size square you need to start with.
- Determine how much bias tape you need for your project. In my case, I used bias tape for the hem of my Fair & Square Top which measured approximately 42" around.
- Decide how wide you want your bias strips. I cut 2" wide strips for a finished double fold bias tape of about 1/2". For a narrower finished bias try 1 1/2" strips, or cut wider strips based on your preference.
- Next grab your calculator and use this simple formula to determine the size fabric square you need. (length needed) x (width of strips) so, 42 x 2 = 84. Use your calculator to find the square root of this number. √84 = 9.165. Round this number up (not down!) to the nearest inch. So I only needed a 10" square of fabric to make enough double fold bias for this entire project!
 |
| Here is my 10" square. I love using stripes, plaid, or woven designs for bias tape. |

Trim of just the very edge giving you two triangles

Now cut your bias strips the width you previously decided. Mine are 2" wide.

Discard the little triangles on top. Your bias strips are ready to be sewn together. I know it doesn't look like much, but it will be enough!

 |
| These are the pieces you should now have. |
.

Extend the points of your fabric edge 1/4" past the edge of your strips of fabric and sew with a 1/4" seam allowance.

Join all your strips in this manner and take your long bias strip to the ironing board. Almost done! Press your seams open. Then fold your strip in half like a hotdog bun (that's my elementary school teaching coming out!) and press using steam for a nice crisp fold. Open your strip back up.


Now press each edge of your strip in to nearly meet the crease in the middle. Again use steam for a nice crisp fold.


Refold your bias tape on the center crease you first pressed and give it one more shot of steam.


Congratulations, you've made your own beautiful bias tape!

Now, let's add it to your project.
Here I have finished my Fair & Square top up to the point of adding the hemband. I added 2" of extra length to the skirt to accommodate not adding the hemband.

To flawlessly add your bias tape to the hem, use a two-step sewing process. First open up your bias tape and align the raw edges of your skirt and bias tape. Begin sewing about 6" from the end of your bias tape. So I began sewing where you see the pink pin, leaving the tape before the pin free.

Sew right in the first crease of your bias tape. This should be about a 1/2" seam allowance.

Stop sewing about 6" - 8" before your beginning point, you should have two bias tape tales and a short section of hem unsewn.

Now we will join the ends of our bias tape forming a loop exactly the size of the garment. Begin by opening up and trimming one end (I do the end on the left) of your bias tape so that you have a 90* angle.

Now, this part can look confusing, but it's really quite easy, just follow the picture! Fold the strip on the left straight down so that the right side of the fabric is facing up. and lay the bias from the right side on top at a 90* angle as seen below. Make sure this strip is not twisted. Sew on the stitching line you marked above.

As the final step, fold your bias tape down over the raw edge of your hem. A little Wash Away Wonder Tape or washable glue stick will be a great help in holding your double fold bias tape in place while you stitch. For easy sewing use your blind hem foot and run the guide along the edge of the bias tape. Topstitch in place about 1/8" from the edge using a slightly longer than normal stitch length.

Now you have a bias tape hem on your Fair & Square Top, or other any other skirted pattern. I paired this top with Pretty Pantaloons using the exposed casing option in the pattern for a cute and coordinated outfit! Sweet Pea is ready to vacation at the beach, and what a sweet summer outfit this turned out to be!


Now, let's add it to your project.
Here I have finished my Fair & Square top up to the point of adding the hemband. I added 2" of extra length to the skirt to accommodate not adding the hemband.

To flawlessly add your bias tape to the hem, use a two-step sewing process. First open up your bias tape and align the raw edges of your skirt and bias tape. Begin sewing about 6" from the end of your bias tape. So I began sewing where you see the pink pin, leaving the tape before the pin free.


Then place the other end over top of your squared off bias tape end so that the raw edges are matched with your hem. Measure and trim so that your bias tape is overlapped by the exact amount that it is wide. In my case 2". My bias tape is two inches wide so I overlapped my bias tape, measured two inches, and trimmed. The arrows below point to the edges of my trimmed bias tape.
 |
| Sorry, this is the one picture where they are lapped the opposite direction. Overlap your pieces whichever way is most comfortable for you. |
Next use a marking pen and ruler to draw a 45* sewing line on your end piece.


Trim the seam allowance to 1/4" and press open. You now have a continuous piece of bias that is exactly the right size for your hem! Head back to your sewing machine and sew the opening closed.
 |
| If you look closely, my seam is right about the middle of this picture. |

 |
| Pretty! |


The uses for double fold bias tape are numerous. Add it to the hem of any skirt or dress as I have here. Omit the ruffle from the RufflePOP skirt and instead finish with bias tape for a fun, non ruffled skirt. Trim the sleeves on your LaTulipe Dress or trim the pockets on your Potato Chip skirts. Double Fold bias tape is a great, easy way to add just a narrow pop of color when a ruffle isn't what you need!
Previous TDD Tutorial Tuesdays you might enjoy:
Comments