I have heard a lot of people asking, 'what are the good fabric collections for Christmas this year?" When Blend Fabrics generously provided me this lovely package of fabrics earlier this month, it gave me two great answers to that question: Anna Griffin's Yuletide Greetings for the traditionalist and Treelicious by Maude Asbury for Blend with fun, contemporary colors and design! Although I received this fabric free of charge from Anna Griffin/Blend, all opinions are my own.

I love the deep hues in the Yuletide Greetings collection - the colors of decorated trees, cinnamon, and gingerbread, and the luxurious scrolls and bows and holiday motifs. It made me think of lush, decadent gifts, and in the spirit of giving, I've created a free tutorial showing you how to make a fabric gift bag, perfectly sized for a bottle of wine.
Fabric Gift Bag Tutorial

You'll need:
For the bag: 2 pieces 6.5" x 16". If your fabric is nondirectional you can fit this into a quarter yard, or of course could use a fat quarter.
For the ties: 1 strip 36" x 3". You can substitute ribbon for the tie if you really want to speed things up ("uh oh, party in an hour, honey, what are we bringing??"), but I love the rich look of the fabric bow.
1. Press the ties strip in half lengthwise with right sides together.


2. Mark the back bag piece for ties placement 3.5" from the top edge along center back. (Mark the right side of the fabric so you can find it easily later.) Place the bag front and back with right sides together. Sew around 3 edges, leaving one short side open, which will be the top of the bag. Finish this seam with a serger or pinking shears, unless you want to give your honored giftee a tangled mess of threads with their wine.


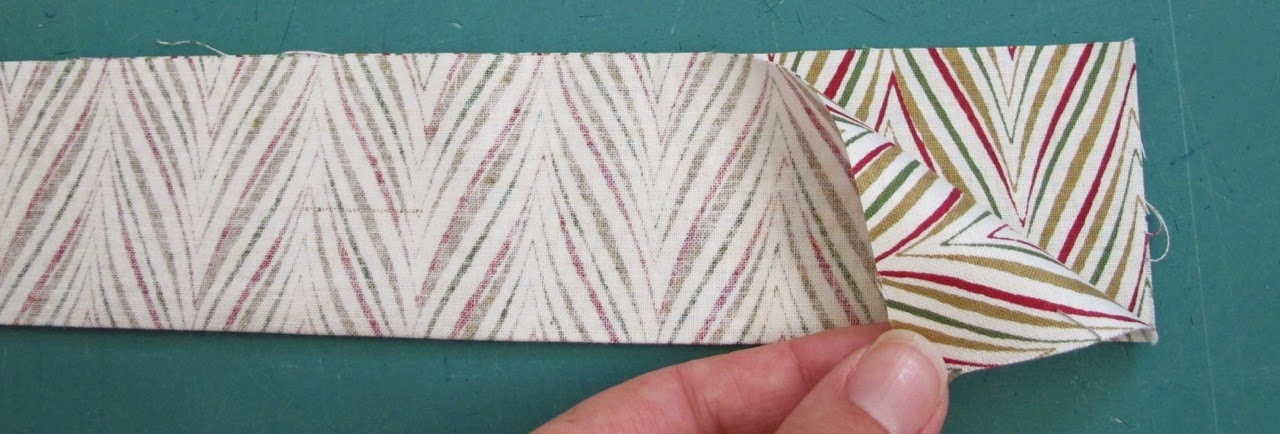
Press this triangle into place, and measure a scant 1.5" from the peak of the triangle. Pin or mark across at this point, then stitch along the line. Repeat for the other bottom corner. Press the triangles well.

Look like this now? Good! Almost done!

4. Hem the top of the bag by serging and turning under ½”, or by turning under ¼” and pressing, then again 1/2” and pressing again, and stitching all the way around.

 |
| Yummy! |
 |
| Anna Griffin Inc. courtesy photo |
Fabric Gift Bag Tutorial
(not ready to make it right now? Hover over the image above and pin it for later!)
You'll need:
For the bag: 2 pieces 6.5" x 16". If your fabric is nondirectional you can fit this into a quarter yard, or of course could use a fat quarter.
For the ties: 1 strip 36" x 3". You can substitute ribbon for the tie if you really want to speed things up ("uh oh, party in an hour, honey, what are we bringing??"), but I love the rich look of the fabric bow.
1. Press the ties strip in half lengthwise with right sides together.


2. Mark the back bag piece for ties placement 3.5" from the top edge along center back. (Mark the right side of the fabric so you can find it easily later.) Place the bag front and back with right sides together. Sew around 3 edges, leaving one short side open, which will be the top of the bag. Finish this seam with a serger or pinking shears, unless you want to give your honored giftee a tangled mess of threads with their wine.
Press this triangle into place, and measure a scant 1.5" from the peak of the triangle. Pin or mark across at this point, then stitch along the line. Repeat for the other bottom corner. Press the triangles well.
Look like this now? Good! Almost done!
4. Hem the top of the bag by serging and turning under ½”, or by turning under ¼” and pressing, then again 1/2” and pressing again, and stitching all the way around.
5. Turn the bag right side out, poking the corners out square. Center the tie at the mark you made on the back of the bag. Pin, and then stitch, into place, taking care to keep the opposite side of the bag out of the way as you sew.

Fill, give, and enjoy!

For more Christmas giving ideas, check out the Fabric Gift Card Holder tutorial on the Tie Dye Diva Patterns instant-download website. I had fun making this one from my scraps!


So .... here we are at the end of the tutorial and you may have noticed, there was a lot more fabric in that box than I've shown you and I cannot wait to show you more of that amazing Treelicious collection! Christmas in July (and maybe a little bit of August) continues on the TDD blog with a gorgeous Year of Dresses post and a terrific giveaway for you! Stay tuned.
Fill, give, and enjoy!
For more Christmas giving ideas, check out the Fabric Gift Card Holder tutorial on the Tie Dye Diva Patterns instant-download website. I had fun making this one from my scraps!
So .... here we are at the end of the tutorial and you may have noticed, there was a lot more fabric in that box than I've shown you and I cannot wait to show you more of that amazing Treelicious collection! Christmas in July (and maybe a little bit of August) continues on the TDD blog with a gorgeous Year of Dresses post and a terrific giveaway for you! Stay tuned.
Comments
Http://Runwright.net